1970년대에 처음 개발된 이더넷은 이후에 IEEE 802.3으로 표준화되었다. 이더넷은 IEEE(Institute of Electrical and Electronics Engineers) 802.3, 즉, 무선 이더넷 매체 접근 제어를 위한 물리 레이어와 데이터 링크 레이어를 정의하는 IEEE 표준을 준수하는 근거리 통신망(LAN) 제품을 말한다1. 이러한 표준은 이더넷 네트워크의 구성 규칙과 네트워크 요소들의 상호 작용 방식도 규정한다2.
컴퓨터는 이더넷을 통해 하나의 네트워크를 제어한다. 이더넷이 없었다면 지금의 세계에서 장치들 간의 통신이 이루어지지 않았을 것이다. 이더넷은 여러 대의 컴퓨터와 장치, 기기 등을 단체의 단일 네트워크에서 결합하여 모든 컴퓨터 사이에 통신이 이루어질 수 있도록 하기 위한 유선 및 케이블 시스템에 사용하는 국제 표준이다. 처음에는 하나의 케이블에서 시작해 여러 장치가 하나의 네트워크에서 서로 연결되도록 했지만, 현재는 이더넷 네트워크가 필요에 따라 새로운 장치로 확대될 수 있다. 이더넷은 현재 세계에서 가장 선호되는 동시에 널리 사용되는 네트워크 기술이다3.
이더넷의 원리
최신 기술은 산업 환경에서 특정 제조 데이터가 정확히 송수신되도록 하는 데 필요하다. 병을 채우는 공장을 예로 들면, 산업용 이더넷 자동화 기술을 사용해 네트워크로 관련 데이터를 전송하면 원하는 대로 병을 채울 수 있다.
이더넷에서 데이터 스트림은 잘게 분리(프레임화)되어서 각각이 데이터의 출발과 도착 등의 특정 정보를 담는다. 그러한 데이터는 네트워크가 필요할 때마다 데이터를 주고 받는데 필요하다.
이더넷 기술에서 사용되는 기타 용어에는 다음과 같은 것들이 있다.
• 매체(medium): 데이터 이동 경로를 제공하기 위해 이더넷 장치 연결에 필요한 이선식 동축 케이블이나 광섬유 케이블 • 세그먼트(segment): 공유되는 매체 하나 • 노드(node): 세그먼트에 연결되는 장치
표준 이더넷은 10 ~ 100Mbps의 속도로 데이터를 전송할 수 있다. 기가비트 이더넷은 IEEE 802.3 표준에서 1Gbps의 속도로 데이터를 전송한다. 기가비트 이더넷은 처음에는 기간망 전송과 고성능 또는 고용량 서버에 일반적으로 사용되지만, 시간이 지남에 따라 데스크톱 연결과 PC에서도 기가비트 이더넷를 지원하게 되었다.
이더넷에 대한 사실
이더넷은 Wi-Fi와 다르다. PC매거진 설명에 따르면 이더넷은 케이블을 사용해 컴퓨터와 장치를 연결하는데4네트워크나 LAN 연결은 거의 대부분 이더넷으로 구성된다.
산업용 이더넷이란 무엇인가?
산업용 이더넷은 보통 더 튼튼한 커넥터와 케이블이 요구되며, 무엇보다 결정성(determinism, 네크워크를 통해 전송되는 메세지가 성공적으로 도달했는지를 규정)이 향상되어야 한다. 산업용 이더넷은 이 결정성을 높이기 위해서 특수한 프로토콜도 함께 사용한다. 더 많이 사용되는 산업용 이더넷 프로토콜에는 PROFINET, EtherNet/IP, EtherCAT, SERCOS III, POWERLINK가 있다.
산업용 이더넷의 경우 데이터 전송 속도가 10Mbps ~ 1Gbps다. 그러나 산업용 이더넷 애플리케이션에서는 100Mbps의 속도가 가장 흔히 사용된다5.
산업용 이더넷의 경우 고려해야 할 사항이 사무실에서 사용하는 일반 이더넷에 비해 많다. 공장에 설치한 제조 장비가 노출되는 온도, 진동, 방해가 되는 진동 수준 등 여러 요소들이 있다.
산업용 이더넷의 원리
PROFINET이나 EtherCAT 같은 산업용 이더넷용 프로토콜은 표준 이더넷을 변경해 특정 제조 데이터를 정확히 주고 받을 수 있을 뿐 아니라 특정한 조작을 수행하는 데 필요한 데이터를 제때 주고 받을 수도 있도록 해 준다. 예를 들어, 병의 속을 채우는 공장의 경우 산업용 이더넷 자동화 기술로 해당 데이터를 네트워크로 전송해서 원하는 대로 병을 채울 수 있다. 리얼 타임 오토메이션(Real Time Automation) 보고서에 따르면 병이 가득 찼을 때는 네트워크를 통해 중단명령이 전송된다6.
사실 사무실에서는 그런 메시지가 크게 중요하지 않다. 홈페이지를 찾을 수 없다는 화면이 뜨면 사용자는 그냥 새로고침 버튼을 누르면 된다. 그러나 공장에서는 사소한 일이 큰 문제가 될 수도 있다. 기업은 누군가가 그러한 오류를 발견해 직접 버튼을 누를 때까지 기다릴 수 있는 시간적 여유가 없다. 산업용 이더넷 자동화 네트워크는 병을 채우는 과정에서 발생하는 오류를 감지 및 자동으로 해당 공정을 중단시켜 시간, 제품, 비용의 낭비를 막는다.
일반 이더넷과 산업용 이더넷의 차이
리얼 타임 오토메이션 보고서는 이더넷이 산업 환경보다는 사무실에서 더 많이 사용될 수 있다고 말한다. 사무실용 이더넷은 기본적인 사용 수준을 고려해 설계되는 반면, 산업용 이더넷은 다층적인 부분을 고려해 훨씬 더 험준한 업무 환경에 적용될 수 있다.
산업용 이더넷은 공장 소음, 공정에서 필요한 사항, 더 험준한 환경을 처리하는 데 적합하며, 현장에서 데이터 충돌이 발생했을 때 더 적절히 대응할 수 있다.
산업용 이더넷 기술에서 사용되는 케이블과 커넥터는 일반 이더넷과 다를 수도 있다. 리얼 타임 오토메이션 보고서는 예를 들어 산업 환경에서 사용되는 커넥터는 끼워 결합시키는(snap-in lock) 기본적인 방식이 아니라고 말한다. 산업 환경에서는 더 확실한 잠금 방식이 필요하다. 험준한 환경에서 사용되는 애플리케이션의 경우 밀폐식 커넥터를 필요로 하는 경우가 많다.
케이블의 경우도 상업용이나 사무실용 이더넷과 산업용 이더넷이 서로 다를 수 있다. 비교적 안정적인 환경의 산업용 이더넷이라 하더라도 케이블의 피복 품질이 일반 이더넷 케이블보다 뛰어날 수도 있다. 또, 예상하는 것처럼 험준한 환경에서 사용되는 산업용 이더넷의 경우는 피복과 사용되는 금속의 품질을 높여 내구성을 향상시킨다.
결정성은 산업용 이더넷을 정의하고 일반 이더넷과 구별할 때 중요한 요인이다. 표준 이더넷은 그 자체로 결정성을 가지지 않지만7, 산업 환경에서는 결정성이 요구된다. 산업용 이더넷은 데이터 패킷을 정해진 시간에 전송하고 수신해야 하며, 데이터가 매번 전송될 것임을 보장할 수 있어야 한다.
그렇지 않고 산업 환경에서 장치 간에 데이터가 손실되거나 데이터 전송이 지연되면 제조 공정에서 커다란 결함이 발생한 것과 같은 수준의 심각한 문제가 될 수 있다. 이러한 실시간 정보 전송은 기업이 설치할 이더넷 솔루션 유형을 선택할 때 중요한 요인이 되는 경우가 많다. 기업은 구체적인 요건을 평가한 뒤 최적의 이더넷 솔루션을 결정해야 한다.
KEPServerEX을위한 고급 태그 옵션은 높은 수준의 보관 및 분석을위한 적절한 정보에 새로운 데이터 및 집계 기존 데이터를 생성하는 편리하고 효율적인 비용, 간단한 방법을 제공합니다. 고급 태그를 통해 사용자는 작업의 지속 시간을 측정 이벤트를 적산, 데이터 수집을위한 트리거 조건을 설정, 센서 그룹을 통해 평균을 수행하고, 전반적인 시스템 상태를 생성하는 기계 조건을 결합 할 수 있습니다. 이러한 기능은 향후 분석을 위해 매우 중요합니다.
Kepware의 경보 및 KEPServerEX에 대한 이벤트 플러그인은 비용을 절감하고 성능을 향상시킬 수 있습니다.
OPC AE 클라이언트는 직접 KEPServerEX의 경보 및 이벤트 플러그인에서 프로세스 알람, 운전자 동작, 정보 메시지 및
추적 / 감사 메시지를 수신하고 모니터링 할 수 있습니다. 장비의 안전 한계, 이벤트 감지 및 비정상 상황; 정의 임계 값과 같은 충족 될 때 운영자의주의가 필요할 수 있습니다 프로세스의 영역을 모니터링합니다. 경보 및 이벤트 플러그인은 유지 보수 작업 주문을 생성하고 운영자의 효율성 개선, 결함이있는 장비를 식별하는 데 도움이 될 수 있습니다. 경보 및 이벤트 처리 연산자 또한, 플러그인은 감사에 대한 알람 및 이벤트 정보를 수집하고 기록하는 데 사용할 수있는 다른 기록 데이터와 상관 관계에 사용됩니다.
OPC 경보 및 이벤트에 대한 플러그인 모듈 통신 서버 KEPServerEX 및 KEPServerEX의 무료 AE (경보 및 이벤트)
클라이언트 인터페이스와 함께 작품을 선도하는 업계. 알람을 만들기 KEPServerEX에서 기존 태그 검색 및 알람으로 사용할 항목을 선택하는 것만 큼 간단합니다. 항목이 선택되면, 상태 및 하위 상태 항목에 대해 설정해야합니다. 트리거는 다음 현재의 데이터 값과 임계 값을 비교 설정됩니다. 상태의 트리거가 충족 될 때 알람이 해당 경보 및 고유의 알람 입력, 출력 및 승인 메시지를 사용자에게 제공하는 이벤트 클라이언트 응용 프로그램으로 전송됩니다.
LinkMaster 는 OPC 시스템을위한 범용 다리 역할을하며, OPC 서버 사이에 데이터를 연결하는 방법을 제공합니다. 또한, LinkMaster는 기존의 DDE 시스템과 새로운 OPC를 사용하는 응용 프로그램 사이의 다리 역할을 할 수 있도록
OPC 및 DDE 서버입니다.
산업용 강도 신뢰성
LinkMaster 는 산업전반에 사용될수 있습니다. : 우주 항공, 자동차, 빌딩 자동화, 자재 운반, 의료, 발전, 차 금속, 펄프 및 제지, 정유, 목재, 유틸리티.
프로그래밍 기술 선택
LinkMaster는 별도의 프로그래밍 지식이 필요없는 빠르고 강력한 Windows 응용 프로그램입니다, 간단하게 "드래그 앤 드롭"으로 링크 를 만들 수 있습니다. 내장 스케일링, 사용자 액세스 관리자, 오류 추적 및 최적화 기능을 쓰기 데이터 흐름과 애플리케이션 액세스의 전체 제어를 제공합니다.
링크 그룹과 제어 데이터 전송
연결 그룹은 지정된 속도로 OPC 서버간에 이동 될 OPC 항목의 컬렉션을 형성하는 데 사용됩니다. 여러 링크 그룹을 사용하여, LinkMaster는 빠른 데이터가 다른 하나의 OPC 서버에서 전송되는 방법을 제어 할 수 있습니다. 당신이 맞게 데이터가 응용 프로그램의 요구에 맞게 전송 할 수있는 다양한 업데이트 속도로 링크 그룹을 사용하여. 하나의 항목이 고속으로 전송해야 할 수도 있지만, 응용 프로그램의 다른 항목이 느린 업데이트 속도가 필요할 수 있습니다. 연결 그룹은 당신이 제어 할 수 있습니다. 이점은 네트워크 트래픽 증가 및 신뢰성을 향상 시킵니다.
여러 OPC 서버가 중복 쌍으로 구성 할 수 있도록하여 OPC 데이터의 안정성과 가용성을 향상시킵니다.
각 중복 쌍 완벽 하 게 모든 OPC 클라이언트 응용 프로그램에 하나의 OPC 서버로 나타납니다. RedundancyMaster는
모든 다운 시간이 초과하여 프로세스가는 유지하는 응용 프로그램의 재구성하지 않고 기존의 클라이언트 / 서버 응용
프로그램에 추가 할 수 있습니다.
산업용 강도 신뢰성 (Industrial Strength Reliability)
OPC 데이터 액세스 (OPC DA) 기술은 기기 및 시스템에 일관된 데이터 액세스를 필요로하는 거의 모든 가능한 상황에서 신뢰할 수 입증되었습니다. 그러나, 시스템의 무결성을 위협 할 수있는 다른 요인이있다, 심지어되는 소프트웨어,
하드웨어 및 인간 요소입니다. OPC 이중화 기술을 사용하여 이러한 시스템은보다 안정적이고 효율적으로 만들 수 있습니다.
투자 수익 (ROI)을 증가 및 시스템을 감소 다운 타임 (Increase ROI & Reduce System Down-time)
추가 시스템의 신뢰성이 요구를 채우려면 Kepware는 RedundancyMaster을 개발했습니다. RedundancyMaster는 OPC
클라이언트 시스템에 상주하며 클라이언트와 서버 사이 OPC 호출에 '후크'하여 시스템의 네트워크에서 기본 및 보조 OPC 서버에 연결을 용이하게합니다. 어떤 이유로 OPC 클라이언트는 기본 OPC 서버와의 통신 연결을 잃게하거나 사용자가 지정한 조건이 충족되는 경우 (항목을 예를 들어 업데이트를 수신하지 않는 경우, 특정 항목의 값을 충족하거나, 품목의 질 나쁜로 설정되어 있습니다) RedundancyMaster는 기본을 삭제하고 네트워크에 보조 OPC 서버를 촉진 - 시간을 시스템을 줄이고 돈을 절약.
사용의 용이성 (Ease of Use)
RedundancyMaster이 될 수있는 드롭 인 (drop-in) 당신의 OPC 클라이언트 또는 서버 응용 프로그램을 변경할 필요가 없습니다. 응용 프로그램입니다. 직관적 인 구성은 분을 소요하고 당신은, 두통 실행 중복 OPC 시스템을 가지고 할 수 있습니다. 단순히 검색하고 선택하여 기본 및 보조 OPC 서버 및 시스템이 실행. 우리는 이메일 통지, 객체와 연결 모니터링 및 진단 로깅 등의 기능이 내장되어 있습니다. 당신은 동일한 OPC 서버 공급 업체를 활용 중복되는 OPC 서버 쌍을 필요로하는 상황에서, 우리는 별칭 기능을 추가 한 * OPC 서버의 ProgID를 (프로그램 ID).
*참고 : 별칭 사소한 OPC 클라이언트 수정을 요구할 수 있습니다
신뢰성 (Reliability)
데이터와 OPC 시스템은 OPC 서버에 대한 연결을 잃을 수있는 더 많은 방법의 품질과 신뢰성에 영향을 미칠 수있는 많은 변수가 있습니다. 가장 일반적인은 다음과 같습니다
OPC 서버를 실행하는 PC가 종료됩니다
사용자 오류로 OPC 서버가 종료 될
OPC 서버로의 네트워크 연결이 손실되거나 신뢰할 수 없을 때
네트워크 링크설정 변경시 failur를 일으키는 경우
OPC 서버 자체 알려진 어떤 이유나, 또는 그렇지 않은이유로 실패시
OPC 서버의 PC에서 로그인 된 계정이 변경될시
위 대부분의 경우에, OPC DA 서버는 OPC 서버 또는 해당 서버에 대한 연결을 기본 실제 오류로 인해 데이터를 제공하는 데 실패합니다. 이러한 유형의 실패는 우리가 "객체 지향"실패라고 부르는 수 있습니다. 귀하의 OPC 클라이언트 응용 프로그램과 대상 OPC 서버 간의 실제 링크가 고장 때 객체 기반 오류가 발생합니다.순간 산업용 응용 프로그램이 데이터를 잃을 수있는 방법을 고려, 우리는 마음에있는 요소의 수를 유지해야합니다. 앞의 예에서, 소프트웨어는 범인이었다. 그러나 응용 프로그램에서 실제 하드웨어 고장이 극적으로뿐만 아니라 안정성에 영향을 줄 수 있습니다. 이러한 물리적 요소 중 일부는 다음과 같습니다
DB에 Logging 되는 Data를 이용하여 Alarm을 생성하여 Email, Text알람전송.
How to configure Database Mail in SQL Server
Database Mail, as you would expect from its name, is a solution for sending e-mail messages from the SQL Server Database Engine to users. Using Database Mail, database applications can send e-mail messages that can, for example, contain query results or simply alert a user about an event that occurred in the database.
The process of Database Mail configuration has three main steps. In order to complete this successfully, we need to:
create a Database Mail account,
create a Database Mail profile,
and configure those two to work together
Configuring Database Mail
To create a Database Mail profile, we can use either the Database Mail Configuration Wizard or T-SQL code. Using Configuration Wizard is easier, but bear in mind that Database Mail is turned off inSQL Server Expresseditions.
Usually, all we need to do is go in Object Explorer, connect to the SQL Server instance we want to configure Database Mail on and expand the server tree. Then expand the Management node and double-click Database Mail or right-click and chooseConfigure Database Mailto open the Database Mail Configuration Wizard:
SinceMicrosoft SQL Server 2016 Expressedition is used in this article as an example, the Management node does not have Database Mail:
This doesn’t mean we cannot use it because it’s only not available as an interface, but it’s still available in the SQL Server Database Engine itself. We just need to enable it using T-SQL.
To enable Database Mail, run the following code:
1 2 3 4 5 6
sp_configure'Database Mail XPs',1; GO RECONFIGURE GO
In this case, running the code triggered an error:
Msg 15123, Level 16, State 1, Procedure sp_configure, Line 62 [Batch Start Line 0] The configuration option ‘Database Mail XPs’ does not exist, or it may be an advanced option.
This is going to happen from time to time because this is an advanced option. To fix this, we need to change theshow advanced optionsdefault value from 0 to 1.
To do this run the following code:
1 2 3 4 5 6 7 8 9
sp_configure'show advanced options',1; GO RECONFIGURE; GO
sp_configure'Database Mail XPs',1; GO RECONFIGURE GO
This time, the query is executed successfully. Once these two options are changed from ‘0’ to ‘1’, Database Mail is turned on:
Now we can get back to setting up the e-mail profile and adding an e-mail account. To do this we will use some stored procedures inmsdbdatabase.
To create a new Database Mail profile named ‘Notifications’ we will use thesysmail_add_profile_spstored procedure and the following code:
1 2 3 4 5
-- Create a Database Mail profile EXECUTEmsdb.dbo.sysmail_add_profile_sp @profile_name='Notifications', @description='Profile used for sending outgoing notifications using Gmail.'; GO
To grant permission for a database user or role to use this Database Mail profile, we will use thesysmail_add_principalprofile_spstored procedure and the following code:
1 2 3 4 5 6
-- Grant access to the profile to the DBMailUsers role EXECUTEmsdb.dbo.sysmail_add_principalprofile_sp @profile_name='Notifications', @principal_name='public', @is_default=1; GO
To create a new Database Mail account holding information about an SMTP account, we will use thesysmail_add_account_spstored procedure and the following code:
1 2 3 4 5 6 7 8 9 10 11 12
-- Create a Database Mail account EXECUTEmsdb.dbo.sysmail_add_account_sp @account_name='Gmail', @description='Mail account for sending outgoing notifications.', @email_address='Use a valid e-mail address', @display_name='Automated Mailer', @mailserver_name='smtp.gmail.com', @port=465, @enable_ssl=1, @username='Use a valid e-mail address', @password='Use the password for the e-mail account above'; GO
To add the Database Mail account to the Database Mail profile, we will use thesysmail_add_profileaccount_spstored procedure and the following code:
1 2 3 4 5 6
-- Add the account to the profile EXECUTEmsdb.dbo.sysmail_add_profileaccount_sp @profile_name='Notifications', @account_name='Gmail', @sequence_number=1; GO
Execute the code from all stored procedures, and you should get the message that the whole code is executed successfully:
If for some reason, execution of the code above returns an error, use the following code to roll back the changes:
If anything goes wrong, executing the stored procedures individually could help in troubleshooting the issue. Just make sure to execute the ‘sysmail_add_profileaccount_sp’ stored procedure after the Database Account, and a Database Profile are created.
Test Database Mail configuration
Okay, now we’ve set up an email account, so what’s next? Well, let’s send a test e-mail and see if it works.
As we mentioned before, we could send an e-mail to alert a user about an event that occurred in the database and this is exactly what we are going to do later on using a simple DML trigger. For now, let’s just send an e-mail to the specified recipient using thesp_send_dbmailstored procedure.
1 2 3 4 5 6
EXECmsdb.dbo.sp_send_dbmail @profile_name='Notifications', @recipients='Use a valid e-mail address', @body='The database mail configuration was completed successfully.', @subject='Automated Success Message'; GO
The Results grid will show the message that the e-mail is queued and ID number:
The code above should send an e-mail using the profile that was previously created to a recipient specified @recipients argument. The subject and body are specified @body and @subject arguments.
Pretty simple, right? Well, not exactly. In this case and in most situations in the real world the mail will not be sent successfully even though every step during the configuration was successful.
Troubleshooting Database Mail
In this case, the e-mail message was successfully queued, but the message was not delivered.
First things first, check if Database Mail is enabled by executing the following code:
1 2 3 4 5 6
sp_configure'show advanced',1; GO RECONFIGURE; GO sp_configure; GO
In the Results grid, make sure that the ‘run_value’ column for Database Mail XPs is set to 1:
To send e-mails, the user must also be a member of theDatabaseMailUserRoleserver role. Members of thesysadminfixed server role andmsdbdb_ownerrole are members automatically. This can be easily checked by going toSecurity>Logins, right-click the current user and selectProperties. In the Login Properties dialog click the ‘Server Roles’ page and make sure that the ‘sysadmin’ server role is checked:
The Database Mail system logs e-mail activity in the ‘msdb’ database. To view the error messages returned by Database Mail, execute the following code:
1 2 3
SELECT *FROM msdb.dbo.sysmail_event_log;
The statement will return logs and in a case like ours when e-mails are not delivered look for the errors under the ‘event_type’ column:
These logs have all sorts of useful information that could help in troubleshooting, and we are in particular interested in the ‘description’ column as it holds detailed information about the error and what went wrong.
The very first error logged says:
2 error 2017-11-13 00:18:27.800 The mail could not be sent to the recipients because of the mail server failure. (Sending Mail using Account 5 (2017-11-13T00:18:27). Exception Message: Cannot send mails to mail server. (The SMTP server requires a secure connection or the client was not authenticated. The server response was: 5.5.1 Authentication Required. Learn more at). ) 12092 1 NULL 2017-11-13 00:18:27.800 sa
However, this information won’t be useful unless there is some documentation e.g. in the TechNet library. There is an article aboutTroubleshooting Database Mailthat provides information for users to quickly isolate and correct common problems with Database Mail, but going through the documentation was not helpful in this case and it took a long time without success.
One other message that was logged of this type was:
28 error 2017-11-14 16:20:01.107 The mail could not be sent to the recipients because of the mail server failure. (Sending Mail using Account 6 (2017-11-14T16:20:01). Exception Message: Cannot send mails to mail server. (Failure sending mail.). ) 14452 8 NULL 2017-11-14 16:20:01.107 sa
The problem, in general, is not with the Database Mail itself and its functionality. The error description messages are not predefined in the SQL Server Engine. This explains the missing Microsoft documentation. Those messages are usually authentication responses from SMTP servers that are required before allowing access to mail services.
To troubleshoot this further, we need to approach the problem from another perspective.
So far in troubleshooting, we have verified the following general steps:
Database Mail is enabled
The user is properly configured to send Database Mail
Sending a test e-mail doesn’t work
No TechNet library documentation could be found for the error messages logged
Another approach could be to setup an e-mail account used for sending outgoing notifications on another e-mail client likeMicrosoft Outlook. This should be fairly simple as both Gmail and MS Outlook are well-known services that should work together and there’s online documentation available on official websites.
To use the Gmail account with MS Outlook, we have to configure it to work withPOP3orIMAP.
Log onto your Gmail account atwww.gmail.comand click theSettingsin the top right corner:
Choose theForwarding and POP/IMAPtab at the top of the page:
In theIMAP Accesssection, make sure thatEnable IMAPoption is selected and click theConfiguration instructionslink at the bottom:
This will open an instruction webpage on how to set up IMAP. Skip the 1st step as we already checked and verified that IMAP is turned on.
Fire up Outlook client to add the Gmail email account to it. Once Outlook is opened, click theFiletab, and selectAdd Account:
In the Add Account dialog, select theManual setup or additional server typesoption and click theNextbutton:
In the next step, choose thePOP or IMAPoption and click theNextbutton:
Use the information from the table below to set up Outlook client with the correct settings:
Incoming Mail (IMAP) Server
imap.gmail.com Requires SSL: Yes Port: 993
Outgoing Mail (SMTP) Server
smtp.gmail.com Requires SSL: Yes Requires TLS: Yes (if available) Requires Authentication: Yes Port for SSL: 465 Port for TLS/STARTTLS: 587
UnderUser Informationsection, make sure to enter a valid e-mail address. The e-mail address entered here will be automatically set asUser Namefor theLogon Informationonce the Account Type is selected from the drop-down box. Once finished, click theMore Settingsbutton on the right to configure additional settings before continuing further:
This will open the Internet e-mail settings dialog. Leave everything as it is under theGeneraltab. Next, click theOutgoing Servertab, check theMy outgoing server (SMTP) requires authenticationcheck-box and select theUse same settings as my incoming mail serveroption:
Move on to theAdvancedtab. Once again, use the information from the table above to set server port numbers. Set the incoming server (IMAP) to993, and the outgoing server (SMTP) to465. From the drop-down boxes select theSSL/TLStype of encrypted connection for both IMAP and SMTP servers. Leave the rest as it is and click theOKbutton to confirm settings:
Now it’s the time to test e-mail account settings to ensure that the entries are correct. Click theNextbutton and this will pop-up two additional dialogs. In the first dialog, Outlook will perform two tasks:
Log onto incoming mail server (IMAP)
Send test e-mail message
This step is crucial as this task previously failed for Database Mail. In the second dialog, Outlook will ask for the username and password. This was already configured, optionally check theSave this password in your password lintoption if your Windows user account is password-protected, and no other person has access to it:
Note: The credential dialog can pop-up more than one time. Just click theOKbutton each time, until the server stops asking for login information. This usually happens when something is not configured right e.g. username or password, port numbers, etc.
In this case, the first task failed and sending test e-mail message failed as well right afterward:
Some applications and devices use less secure sign-in technology, which makes their respective accounts more vulnerable and Gmail will block these sign-in requests. By default, access for these applications is turned off, but we can also turn access on to use them despite the risks. In this case, we also have to.
This can be solved by logging into Gmail account and making sure thatLess secure appsoption is enabled for the desired account. Go to theLess secure appssection of the Gmail account and enable access for less secure applications.
Note: This setting is not available for accounts with2-Step Verificationenabled. Such accounts require an application-specific password for less secure apps access.
Since this account has 2-Step Verification enabled, we have to turn it off, so we can continue further.
Go to ’Sign in & security’ section ofMy Account, select 2-Step Verification, sign in using your credentials, and enter verification code if asked received via text message with a 6-digit verification code or phone call, and click theTurn offbutton:
A pop-up dialog will appear informing the user about security and vulnerability. We are aware of this, so just click theTurn offbutton to continue:
Now we can go back to theLess secure appssection and allow access for less secure applications:
Back to Outlook, click the Next button once again to test e-mail account settings and finally a message without errors. Both tasks completed successfully:
The test e-mail message is also delivered successfully which means that sending another test e-mail from Database Mail should work this time:
There is only one way to find out. Go back to SSMS and execute the code for sending the test e-mail:
1 2 3 4 5 6
EXECmsdb.dbo.sp_send_dbmail @profile_name='Notifications', @recipients='Use a valid e-mail address', @body='The database mail configuration was completed successfully.', @subject='Automated Success Message'; GO
Unfortunately, even after all this trouble, the test e-mail is not getting through. A quick look at the log files shows another error message of another type:
51 error 2017-11-18 16:21:22.803 The mail could not be sent to the recipients because of the mail server failure. (Sending Mail using Account 10 (2017-11-18T16:21:22). Exception Message: Cannot send mails to the mail server. (Failure sending mail.). ) 3564 14 NULL 2017-11-18 16:21:22.803 sa
At this point, let’s do a quick look up, just to make sure that the e-mail profile is configured the same as it is for Outlook. Execute the code from below:
This will return settings for account name, server type, server address, and port number:
Everything looks good, but the e-mail is still not getting out. A quick online lookup of the error message leads to aStack Overflowthread in which the user has the exact same error message. In the comment section, another user says that changing the port number to 587 instead of 465, even though information from Gmail says otherwise, fixed the issue for him. As we are running out of options here, let’s try that and see what happens.
We will use thesysmail_update_account_spstored procedure to change the port number in the existing Database Mail account.
Execute the following code:
1 2 3 4
EXECUTEmsdb.dbo.sysmail_update_account_sp @account_name='Gmail', @port=587; GO
Execute the code from the previous step to verify that the change is applied. The port number will change leaving all other account information intact:
For some reason configuration instructions for SSL provided by Google does not work on port 465 for Database Mail system, but port 587 that is specified for TLS/STARTTLS worked like a charm.
Finally, after giving it another try there is a new e-mail in the inbox sent from the Database Mail system:
Send e-mail from a trigger
To demonstrate how to send an e-mail notification to a user when a specific event occurred in the database, we can create a simple trigger.
Use the code below to create a trigger namediProductNotificationon the Product table which is contained in the Production schema:
IFOBJECT_ID ('Production.iProductNotification','TR')ISNOTNULL DROPTRIGGERPurchasing.iProductNotification GO
CREATETRIGGERiProductNotificationONProduction.Product FORINSERT AS DECLARE@ProductInformationnvarchar(255); SELECT @ProductInformation='A new product, '+Name+', is now available for $'+CAST(StandardCostASnvarchar(20))+'!' FROM INSERTEDi; EXECmsdb.dbo.sp_send_dbmail @profile_name='Notifications', @recipients='Use a valid e-mail address', @body=@ProductInformation, @subject='New product notification' GO
This trigger will fire when an Insert statement is run against the Product table. The idea behind it is to collect basic information about a new product that is available like name and price and to wrap that information up in a simple e-mail message that will be sent to desired addresses using the Database Mail profile previously configured:
Once the trigger is created, refresh the ‘Triggers’ node under the ‘Product’ table just to make sure that the trigger is created on the right table:
Rather than typing the code for the Insert statement and because it’s easier, use the ‘Edit Top 200 Rows’ option from the right-click context menu on the table with the trigger. Fill in some information like working with Excel sheets. Once done, hit theEnterkey to continue:
This will issue an Insert statement in the background and fire the trigger. As a result, the trigger will collect some information about the Insert statement, invoke the Database Mail profile, and use it send e-mail to the desired recipient:
Sending query results e-mail message
Another example could be sending an e-mail message that contains query results. Execute the following code:
일정 시간 마다 Remote Server에 Data를 Move하거나 update할 경우 사용한다.
성공하거나 실패할 경우, 정해진 동작(다음 Step을 진행 하거나 Alarm을 줄 수 도 있다.)을 실행 한다.
Introduction to the SQL Server Agent
In this article, I am going to explain in detail about the SQL Server Agent service. This is a windows service that enables database developers and database administrators to schedule jobs on the SQL Server machine. The jobs can be simple T-SQL scripts, stored procedures, SSIS packages or SSAS databases. This service is available on all the editions of SQL Server except the Express edition.
Overview
In this era of automation, it is often required that we execute multiple scripts repeatedly in a timely fashion. These scripts can be used to back up an existing database, delete extra log files, process data from a table, drop and rebuild indexes on a table, or running an ETL job etc. All these tasks are repetitive and can be automated using the SQL Server Agent. This gives us the flexibility that the job will be executed as per the rules defined in the schedule and there is minimal human intervention required in order to execute these jobs. Once the jobs are executed, you can view the history if the execution was successful or failed. In case of a failure, there is an option to restart the job manually.
There are a few components of the SQL Server Agent service that you must be aware of before proceeding forward.
Jobs– This is a program that defines the rules about the repetitive execution of one or more scripts or other utilities within the SQL Server environment
Steps– These can be considered as the building blocks of the jobs. Your job can contain one or multiple steps. Each step executes a specific set of instructions. The next step can be executed based on the success or failure of a previous step
Schedules– These are periodic rules set on the job to execute automatically based on a pre-defined time slot. These jobs can be scheduled hourly, daily, weekly, monthly, or even on specific days of the week
Alerts– SQL Server generates events that are stored in the Microsoft Windows Application Log. Whenever the agent finds a match, it fires an alert which is a response to the event
Notifications– You can set up email notifications to update about the result of the job execution. This is mostly done in case of job failures so that the person responsible for the jobs can take appropriate actions
How to find the windows service
Now that we have some idea about the SQL Server Agent, let us now go ahead and start the service if not already done. In my machine, the service is currently not running, and I am going to start it from scratch. You can follow the steps below to start the agent service on your machine.
Head over toRunand type the commandservices.msc. ClickOKonce done.
Figure 1 – Opening the Windows Services
Once you hitOK, theServiceswindow will show up. You can scroll below to find the service with the name “SQL Server Agent (<<INSTANCE NAME>>)”. As you can see in the figure below, the status of the service is not running. Let us go and start the service.
Figure 2 – Starting the SQL Server Agent Service
Right-click on the service and selectStartfrom the context menu.
Figure 3 – Starting the SQL Server Agent Service
It might take a while to start the service. Once the service has started, the status will change toRunning.
Figure 4 – SQL Server Agent Service Running
Now, you can verify the status of the SQL Server Agent service using theSQL Server Management Studioas well. Head over to SSMS and navigate to the SQL Server Agent on the bottom of theObject Explorer.
Figure 5 – SQL Agent running in SSMS
Preparing the database
Now that our agent service is up and running, let us create our first job using the graphical user interface. We can also create jobs using T-SQL scripts; however, it is out of scope for this article and will be covered in some later articles. To demonstrate the execution of the job, we will create a small table in a SQL Server database that will store the date and time of the execution along with a random number. This is a dummy table just to demonstrate the feature. You can use the following script to create the table.
1 2 3 4 5 6 7 8 9 10 11 12
CREATEDATABASESqlAgentDemo GO
USESqlAgentDemo GO
CREATETABLESqlAgentDemoTable( [ID]INTIDENTITY(1,1), [Number]FLOAT, [Timestamp]DATETIME ) GO
In this table, we are going to use the following script to insert records.
As we have prepared our database, let us now create the job using the GUI. Right-click onJobsand selectNew Jobfrom the context menu.
Figure 6 – Selecting New Job from the context menu
As you click onNew Job, the window appears on which you can define the properties of the job that you want to create.
Figure 7 – Creating the New Job
If you look at the figure above, under theGeneraltab, I have provided a validNameto the job. TheOwnerof the job should be a defined user in the SQL Server environment. I am logged on using myWindows Authenticationmode. There is a Description field, where you can provide details regarding the tasks performed by the job. This is purely for documentation purposes. Finally, make sure that theEnabledischecked, otherwise, the job will not trigger. ClickOKonce done and click onSteps.
Figure 8 – Defining Steps
Navigate to theStepssection and click onNew. Here we will define the steps in the job. For this article, we will consider a single step, but there can be multiple steps as well.
Figure 9 – Defining the Job Step
Provide anameto the step and select the steptype. Since we are going to execute a T-SQL statement, please selectTransact-SQL script (T-SQL)from the dropdown. Select theDatabaseon which the script is to be executed and provide theSQL commandas mentioned. ClickOKonce done.
Click onSchedulesand selectNew.
Figure 10 – New Schedule
Figure 11 – Defining the new Job Schedule
On theNew Job Schedulewindow, provide anamefor the schedule. Most often, we keep a descriptive name so that it is easier to understand the nature of the schedule. Select theSchedule TypeasRecurringsince we are going to execute the job repeatedly. Select theFrequencyasDailyandDaily Frequencyasevery 10 seconds. In real applications, it is usually scheduled every hour or every day depending on the requirements. ClickOKonce done.
Finally, clickOKon theJob Propertiespage. Your job has been successfully scheduled now.
Viewing the data
Let us now execute the following command to view the data.
1
SELECT*FROMSqlAgentDemoTable
Figure 12 – Viewing the automated data
Since the job is scheduled to execute every 10 seconds, we can view the data from the table easily and verify the execution of the job. A new record will be inserted every 10 seconds from now on.
Viewing Execution History
Alternatively, you can also view the execution history of the job by right-click and selecting View History from the context menu.
Figure 13 – View Job History
This will open theLog File Viewerwindow, where you can see the status of all the executions so far. All successful executions are highlighted ingreenwhile failed executions will be highlighted inred.
Figure 14 – Log Viewer Window
Conclusion
In this article, I have explained in detail about how to schedule jobs in SQL Server using the agent service. This is a very powerful scheduling agent that can do a lot of the heavy lifting in terms of database maintenance and running other business jobs. Using the agent service and the monitoring service, you can monitor the active jobs that are currently running, the jobs that have failed or yet to start execution. You can also script the creating of the jobs totally, however that requires a bit of experience with the system stored procedures and various commands associated with it. If you are starting new with scheduling jobs in SQL Server, I would rather advise using the graphical user interface to create and manage the jobs on the server.
Summary: in this tutorial, you will learn about views and how to manage views such as creating a new view, removing a view, and updating data of the underlying tables through a view.
When you use theSELECTstatement to query data from one or more tables, you get a result set.
For example, the following statement returns the product name, brand, and list price of all products from theproductsandbrandstables:
SELECT product_name, brand_name, list_price FROM production.products p INNERJOIN production.brands b ON b.brand_id = p.brand_id;
Next time, if you want to get the same result set, you can save this query into a text file, open it, and execute it again.
SQL Server provides a better way to save this query in the database catalog through a view.
A view is a named query stored in the database catalog that allows you to refer to it later.
So the query above can be stored as a view using theCREATE VIEWstatement as follows:
CREATEVIEW sales.product_info ASSELECT product_name, brand_name, list_price FROM production.products p INNERJOIN production.brands b ON b.brand_id = p.brand_id;
By definition, views do not store data except forindexed views.
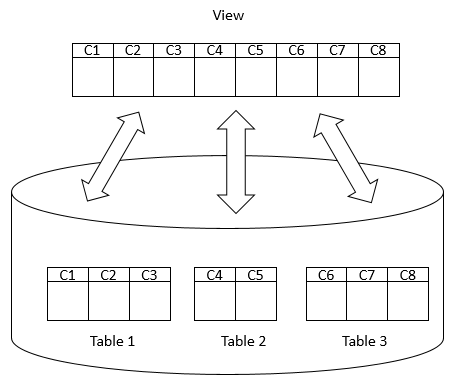
A view may consist of columns from multiple tables using joins or just a subset of columns of a single table. This makes views useful for abstracting or hiding complex queries.
The following picture illustrates a view that includes columns from multiple tables:
Advantages of views
Generally speaking, views provide the following advantages:
Security
You can restrict users to access directly to a table and allow them to access a subset of data via views.
For example, you can allow users to access customer name, phone, email via a view but restrict them to access the bank account and other sensitive information.
Simplicity
A relational database may have many tables with complex relationships e.g., one-to-one and one-to-many that make it difficult to navigate.
However, you can simplify the complex queries with joins and conditions using a set of views.
Consistency
Sometimes, you need to write a complex formula or logic in every query.
To make it consistent, you can hide the complex queries logic and calculations in views.
Once views are defined, you can reference the logic from the views rather than rewriting it in separate queries.
아래 보기와 같이 Remote서버에 연결하여 Proto Type의 결과물을 빨리 만들고자 할때 Linked server가 유용하다.
하지만, 속도에 문제가 있다.
그래서, 실제 Remote서버의 Data를 사용할때에는 OPENQUERY를 추천한다.
Linked Server in SQL Server: the good, the bad, and the way to make it perfect!
Introduction (the good)
If you are not familiar with a linked server concept in SQL Server, don’t worry, you probably haven’t needed it yet. You are fortunate to source all your data needs from a single database server, and that is fine. Or maybe you are consuming your SQL Server needs from Azure Single Database or AWS RDS (both public cloud solutions don’t support linked server out of the box).
Most likely this is going to change (Azure VM and AWS EC2 have full support) and you will have to join data between multiple database servers, or even between different RDBMS systems. For example: All the transactional sales data is stored in SQL Server, but all the analytical sales data is stored on another SQL Server server (this could even be MySQL).
This is where Linked Server comes in handy, especially at the data discovery phase. When building a prototype needs to happen quickly and there is no time to adhere to the best practices, Linked Server can be the answer.
Linked Servers Basics
According to Microsoft, linked servers enable the SQL Server Database Engine and Azure SQL Database Managed Instance to read data from the remote data sources and execute commands against the remote database servers (for example, OLE DB data sources) outside of the instance of SQL Server.
Linked Server is a pure convenience feature. With very little to no code changes, you can suddenly join multiple tables between local and remote/cloud servers. For example, let’s use WideWorldImporters transactional database
Figure 1
Linked Server effectively removes the need for a solution that will move and synchronize the data. You just setup a Linked Server (see Fig #2) and add a Linked Server reference in front of the three-part naming convention (see Fig #3). That’s all. A small price to pay for lots of convenience.
Figure 2
Figure 3
Problem (the bad)
While the Linked Server feature makes it easy to join tables between two or more different servers, it’s not free and it comes with a price tag: performance overhead. While joining a few small tables might not add noticeable pressure to the server, joining 3-5 fairly large remote tables might introduce locking and blocking and increase the run-time from seconds to minutes.
The main problem occurs when you run queries against a remote server, which is not healthy. When SQL Server runs a query with Linked Server, it will use the least optimal execution plan due to lack of knowledge of those remote tables. Meaning, your local SQL Server is clueless on remote table indexes and statistics, so it might use an incorrect joining mechanism and might be grossly inefficient.
For example, if you had to join all January 2013 orders between OLTP and OLAP tables and compare revenue per product while showing the five top contributors, we might build the following query (see Fig #4) to achieve that goal:
Figure 4
Reviewing Statistics IO (see Fig #5) and execution plan details (see Fig #6), we see:
Figure 5
Figure 6
As you might notice (far right), 93% of the query execution cost goes to a “mysterious” remote query.
Solution (a way to make it perfect)
One of the easiest ways to fix performance problems with a linked server is to run it via OPENQUERY.
What is OPENQUERY?According to Microsoft, OPENQUERY executes the specified pass-through query on the specified linked server. This server is an OLE DB data source. We can reference OPENQUERY in the FROM clause of a query as if it were a table name. We can also reference OPENQUERY as the target table of an INSERT, UPDATE, or DELETE statement. This is subject to the capabilities of the OLE DB provider. Although the query may return multiple result sets, OPENQUERY returns only the first one.
One of the main advantages of OPENQUERY is remote execution. This means the local server sends the query to the remote server with knowledge of those remote tables that are now local to the query. By the way, remote execution also enables the use of native syntax of the remote server, so you can take advantage of other RDBMS system performance tricks.
Here is how our original query will look with an OPENQUERY (see Fig #7). It’s still using the same linked server, but it happens indirectly now with an OPENQUERY.
Figure 7
When reviewing Statistics IO (see Fig #8) and execution plan details (see Fig #9), we now see:
Figure 8
Figure 9
Let’s compare Statistics IO and execution plans to see the differences between direct query linked server usage vs. an OPENQUERY linked server.
The most noticeable differences are:
WorkFile reads in Statistics IO (see Fig #10)
Remote Query 93% cost vs. most distributed cost in Execution Plan (see Fig #11) and partially replaced with Remote Scans.
Figure 10
Why Does It Work?
The main reason OPENQUERY will usually perform better is knowledge of the table in terms of indexes and stats, knowledge that a direct linked server doesn’t have.
As you can see, we have managed to cut the run-time from 22 seconds (using direct link server) down to 2 seconds (using OPENQUERY). Additionally, we can add indexes specific to the query to make OPENQUERY even faster.
Disclaimer
Since nothing is certain in this life other than taxes and death, your mileage may vary (“YMMV”). Please test it (preferably using DBCC FREEPROCCACHE) prior to deployment. In addition the query above that reduced run-time by 11 times, I also scored a drastic performance gain by using OPENQUERY in one of the clients. In that example, replacing all three direct linked server references reduced run-time by 10 times, to just a few seconds.
Sensor Connections: PNP versus NPN and Sourcing versus Sinking
산업자동화에는 24V용 센서가 주로 사용되며, NPN, PNP 두가지 타입이 있습니다. 두가지 타입의 센서는 PLC의 DI(Discrete Input) 모듈의 두가지 타입인 소스방식과 싱크방식에 맞춰서 사용해야 합니다.
Transistor Effects
ON-OFF 형태의 신호를 다루는 전자장치(예를 들어, 입력센서)는 트랜지스터를 내장하고 있습니다. 트랜지스터는 반도체 재질의 소형 릴레이이며, 전류를 흐르거나 차단하는 스위치와 같은 역할을 합니다. 트랜지스터는 약한 신호를 감지후 신호를 증폭하는 역할도 하게 됩니다. 증폭된 신호는 PLC의 입력모듈 또는 기타 장치들로 전달될 수 있습니다. 트랜지스터는 NPN(sourcing), PNP(sinking) 두가지 타입이 있습니다.
"P", "N"은 반도체 물질의 종류를 의미하며, "PNP", "NPN"은 이 물질들의 배열순서를 의미합니다. 트랜지스터는 base, collector, emitter로 구성된 3개의 핀을 가지고 있습니다.
PNP versus NPN Switching
산업용 3선식 센서는 대부분 아래와 같은 선으로 구성되어 있습니다.
* +24 Vdc
* 0 Vdc
* 신호선
+24 Vdc, 0 Vdc 선은 센서의 구동에 필요한 전원공급용이며, NPN, PNP타입은 신호선이 어떻게 구동될 것인지 결정하게 됩니다.
PNP 타입의 센서는 emitter에 +24 Vdc가 인가되고, collector에 sinking 타입 PLC 모듈과 연결됩니다. 센서가 특정한 물체를 감지하면 base에 전류를 흐르게 하여 emitter-collector간 전류가 흐르게 됩니다. 즉, 신호선쪽으로 +24 Vdc가 인가되고, PLC의 sink 타입 입력모듈 단자를 통해 포토커플러(빛을 이용하여 전류를 흐르게 하는 스위치. 입력모듈이 입력을 확인하는 용도로 사용)를 거친후 0 Vdc로 이어지게 됩니다.
NPN 타입의 센서는 emitter에 0 Vdc가 인가되고, collector에 source 타입 PLC 모듈과 연결됩니다. 센서가 특정한 물체를 감지하면 base에 전류가 흐르게 하여 collector-emitter간 전류가 흐르게 됩니다. 즉, 신호선쪽으로 0 Vdc가 인가되고, PLC의 source 타입 입력모듈 단자를 통해 포토커플러를 거친후 +24 Vdc로 이어지게 됩니다.
Three-Wire Devices and Leakage Current
3선식 센서는 트랜지스터 특성상 누설전류가 발생합니다. 센서가 신호선 스위치를 OFF하고 있음에도 신호선을 통하여 미세하게 전류가 흐르는 현상입니다. 비정상적으로 높은 누설전류는 의도치 않게 PLC의 입력모듈내 포토커플러를 동작시켜 마치 센서가 무언가를 감지한 것처럼 인식하게 만들수 있습니다.
Sourcing versus Sinking Circuits
sinking(싱크방식) 입력모듈은 PNP 센서와 사용되며, 입력모듈은 센서 감지시 신호선에 +24 Vdc가 인가되길 기다리고 있습니다.
sourcing(소스방식) 입력모듈은 NPN 센서와 사용되며, 입력모듈은 센서 감지시 신호선에 0 Vdc가 인가되길 기다리고 있습니다.
PLC 기종의 따라 sinking/sourcing를 반대로 표기하는 경우도 있으니, 입력모듈의 결선도는 꼭 확인해 보는 것이 좋습니다.
Benefits of PNP versus NPN
PNP 타입의 센서는 케이블 손상시 신호선과 0 Vdc선이 단락될 경우가 있을 수 있습니다. 그 결과로 센서가 손상될 것입니다.
NPN 타입의 센서는 케이블 손상시 신호선과 0 Vdc이 단락될 경우가 있을 수 있습니다. 그 결과로 입력모듈에 계속 신호가 들어오는 형태가 되지만 센서가 손상되지는 않습니다.